What is PrimeTurning?
What is the big deal with PrimeTurning? We’ll explain how this cutting-edge toolpath technology works in Mastercam and how it affects your programs.
By John Stauffer and Callie Morgan
Wednesday, May 25th, 2022, 8:00 AM PDT
At first glance, Sandvik Coromant’s PrimeTurning toolpath for Mastercam Mill-turn and Lathe doesn’t seem like a big departure from traditional Lathe turning. When programmed correctly, PrimeTurning looks like the tool moves from the back towards the front of the part. So how does this toolpath option differ from typical Mastercam toolpaths?
PrimeTurning technology doubles the speed and feed of toolpaths, which can double your tool life and increase overall machine productivity by an average of 50-80%.
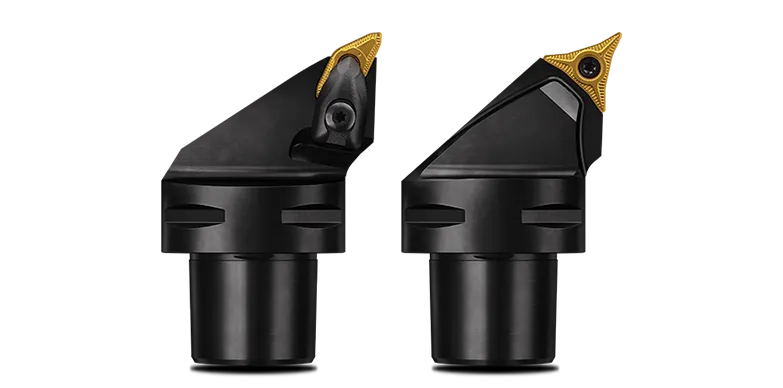
The power of PrimeTurning comes from its specially designed insert geometry. PrimeTurning provides you with 2 basic Sandvik insert tool inserts to choose from, A-type and B-type. These inserts can go into stick holders or specialized Sandvik insert holders. While the roughing insert (B-type) might look like a fairly standard tool, it’s actually quite different. The shape ground into the edge of the tool is specifically designed to run from the spindle to the face of the part. Traditionally, this is backward from standard Lathe turning. This allows the tool to take a gradual cut depth along the side of the insert rather than concentrating the cutting forces at the tip, which translates into a relatively huge cutting edge.
An Application of PrimeTurning
Let’s look at an example of roughing. In a steel piece, we might turn with a conventional cutter at about 1080 SFM, feeding at .013 FPR and a .15 DOC radial. These numbers are somewhat aggressive but if you have the machine horsepower, it’s definitely achievable. This would get us a removal rate of 19.47 cubic inches per minute.
Now, if we instead use PrimeTurning within the same application, we’ll see a huge increase in our removal rate. In the same application with the same material, you could run PrimeTurning (using the B-style insert for roughing) at about 1150 SFM, .047 FPR, and .12 DOC radial. That huge jump in FPR nets us a 77.69 cubic inch per minute removal rate! You will typically witness improved tool life, about 50% or more.

PrimeTurning isn’t limited to roughing either. The A-style insert has a modified triangle shape that works well for semi-roughing, semi-finishing, and finishing applications. Its narrow body shape can get into tight corners and finish features on turned parts. While not as impressive of a difference as the roughing was (from 11 cubic inches per minute to 17 cubic inches per minute in the same application), it’s still quite a difference in production. All while leaving a great surface finish for your turned parts.
What Makes PrimeTurning Unique
You might have seen low-approach angle cutters before, so why is PrimeTurning different? The main difference is the direction in which the angle is cut. In a more traditional low-approach cutter, it still feeds from front to back, which does have the support of the back of the jaws (if the jaws have backs).
However, because the angle is positive towards the spindle, it’s impossible to cut a square shoulder when turning. Those tools will always require another tool to finish roughing out the section that a low approach angle tool leaves behind. Depending on the geometry, it could be a significant amount of material. PrimeTurning holds the insert in the opposite direction, allowing sharp and clean shoulders right from the start.

How to Use PrimeTurning Effectively
For everything you gain with PrimeTurning, there are some considerations. Great workholding is critical to PrimeTurning’s success. Generally speaking, if you are using PrimeTurning, you want to make sure you are either running relatively short parts (3xD length or less) with great clamping pressure or with a sturdy center opposite the spindle. Without great workholding, there is a chance that the part will pull right out of the spindle, causing major problems. Additionally, the high radial forces imparted by PrimeTurning make it a poor choice for applications where the material has a small diameter relative to its length.
To reap all the rewards PrimeTurning has to offer, use the PrimeTurning toolpath in Mastercam. This toolpath was designed with Sandvik Coromant specifically to work with their A and B style tool inserts. Make sure to chain from the spindle side towards the face of the part for outer diameter (OD) turning operations. If you have experience in standard Lathe programming, most of the other fields are fairly easy to figure out. You can also check out the Mastercam Help Guide within the Mastercam interface for more information.
The PrimeTurning toolpath can only be used with PrimeTurning-defined tools. There is a library of those tools installed with Mastercam in your Lathe Tools folder in the Mastercam Shared folder.
For more information on Sandvik PrimeTurning, check out this great success story from Riedl CNC. There are links to the Sandvik pages in the description of that video.
Would you like to see a PrimeTurning lesson group? Let us know by emailing us at [email protected], or using our contact page here.
For access to more in-depth Mastercam training content, sign up for a Streamingteacher account here!
Follow Us!
Facebook: https://www.facebook.com/Streamingteacher
LinkedIn: https://www.linkedin.com/company/streamingteacher/
Twitter: https://twitter.com/Streamingteach